JetCarrier – get an mailbox in the USA (for Norwegians, Danes and Swedes)

JetCarrier.com has a service that lets Norwegians, Danes and Swedes get an address in the USA to be able to order things that isn’t shipped overseas by default, like the original Apple iPhone, a Chumby or something you would like to buy on eBay that the seller wouldn’t ship overseas. JetCarrier will then forward your parcel for you (they ship the parcel themselves by air or by sea). They will do all the customs work, that’s included in the handling and shipping fees. You would only need to pay the VAT (Value added tax) if the price for the product is over 200,- NOK.
If you sign up for JetCarrier you’ll get an address like this that you could use when shopping overseas:

JetCarrier [your customer number]
Att: [your name]
601 W Linden Av Suite [your customer number]
Linden, NJ 07036

So if your name is John Doe, and your customer number is 31337, then your adress would look like this:

JetCarrier 31337
Att: John Doe
601 W Linden Av Suite 31337
Linden, NJ 07036

You will get a real address and not just an post box. This was how I ordered my original iPhone back in 2008. Many other Norwegians did the same thing when ordering their iPhones.
There is also a similar service called Ship2Me that also gives you an US address, and Forward2Me that gives you an UK address. These services use regular shipping services to ship packages to your country, which means they could ship to most countries in the world.

Disable 1-Click purchases for Apple App Store

If you have made iTunes not ask you about buying iOS Apps in the “Are you sure you want to buy and download …?” dialog-box (see below), you could get that warning back by using the “Reset all warnings for buying and downloading” feature on your iTunes Account information page.
Quote from the iTunes Store – Terms and Conditions:

1-Click is a convenient feature that allows you to make a purchase from the Services with a single click of your mouse or other input device. When accessing the Services on your computer, 1-Click purchasing may be activated via the dialog that appears when you click a Buy button. (You may reset this selection at any time by clicking Reset Warnings in your Account information). When accessing the Services on your Apple-branded products running iOS such as an iPad, iPod touch, or iPhone (“iOS Device”), 1-Click is activated for each transaction by tapping the button showing the price of the product, which reveals the Buy button. When 1-Click is activated, clicking or tapping the Buy button starts the download immediately and completes your transaction without any further steps.

Step-by-step guide:

  1. Go to the iTunes Store in iTunes, and sign in (if you aren’t signed in already).
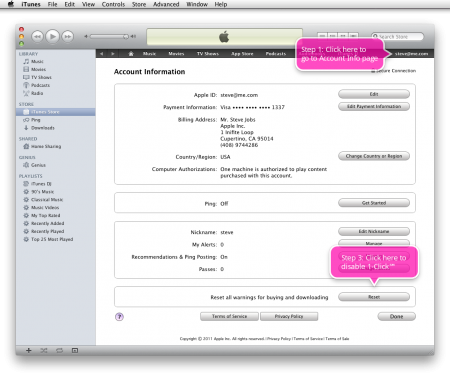
  2. Click on your Apple ID (your e-mail address) in the upper right hand corner of iTunes.
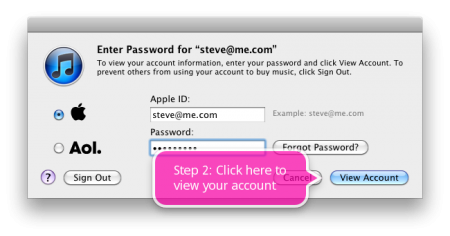
  3. Enter your password in the password field, and then click the [View Account] button.

    (Version of picture without labels).
  4. Click the [Reset] button in the “Reset all warnings for buying and downloading” part of your iTunes Account information page.

    (Version of picture without labels).
  5. You should now see this dialog box the next time you try to purchase something in iTunes.

(No, I didn’t read the iTunes Store T&C when I started using iTunes Store. I just googled for “Are you sure you want to buy and download” and got to the iTunes Store T&C, and then found out how to reset this warning).
(Tags (for search engines): One click purchases, One-click purchases, 1-Click purchases, 1 Click purchases, Apple, iPhone, App Store).

DIY – Force an iPhone to charge on a regular USB-charger

Hacked USB extension cord + iPhone USB cable
The hack connected to a 12 VDC USB charger

I discovered an easy hack to force an iPhone 3G[S] to charge on a regular USB-charger with just one resistor.
To force charging you have to force high the levels of the data pins 2 (D-) and 3 (D+) (white and green wires) by connecting a resistor of about 20 kΩ (or 68 kΩ as I used) between the data pins on the USB cable. This resistor would act as a pull-up resistor. You don’t need to connect this resistor to VCC (+5 VDC) since the iPhone outputs +2.84 VDC on the data pins when it is connected to a power source. This is enough to force the levels of the data pins high. To do this hack, I recommend using an USB extension cord, instead of ruining an iPhone USB-cable, since you of course wouldn’t be able to use this as an regular USB-cable afterwards.

iPhone charging hack schematics
Schematics

Remember to leave the data wires going to the male USB-connector end (the one you plug in to your power source) unconnected, you might seal the ends with insulating tape or glue. This way you could use this cable to be able to charge an iPhone on a computer that is in standby-mode or a computer that supports the sleep-and-charge USB feature, which would let you charge your devices even when the computer is turned off.
This hack would probably work on other iPhone models too, the iPod Touch, Classic, Shuffle & Nano models, and the iPad. It might even work on other devices needing a signal on the data pins to be able to charge.

More information

Links to interesting articles about iPhone charging, where I found out how easy it was to force an iPhone into charging mode:

Charging my iPhone with my hacked USB cable

Apple iPod, iPad and iPhone dock Connector Pinout – AllPinouts has some information about force charging using two 10k resistors connecting D+ and D- to VCC
USB – Universal Serial Bus Connector Pinout – AllPinouts also mentions that one could use 10k resistor to force charge USB devices.
Modify a generic USB car charger to charge a 3rd gen iPod Nano – Instructables Instructables article about modifying a car charger to be able to charge an iPod Nano. Also use two resistors.
How to Charge an iPhone – tzywen.com Mentions how to force charge an iPhone, and shows a proof-of-concept charging circuit schematics.
DIY iPhone Charger – tzywen.com A DIY iPhone charger using 4 resistors, made from the proof-of-concept shown above.
DIY iPhone 3G Charger – tzywen.com another DIY iPhone charger using 4 resistors. Also mentions why an iPhone needs a pull-up-resistor to be able to charge.

Disclaimer

I take absolutely no responsibility for what might happen to your iPhone, your charger or even yourself using the method mentioned above. You do this solely at your own risk.

Creative Commons License
DIY – Force an iPhone to charge on a regular USB-charger by HÃ¥var I. Henriksen is licensed under a Creative Commons Attribution-ShareAlike 3.0 Unported License.

Kon-Boot: Bypass Windows login-password with a LiveCD

KryptosLogic splash screenKon-Boot is a great LiveCD that allows you to bypass any Windows login-passwords, in case you’ve forgotten the password, and tools like Ophcrack isn’t able to find your password. Kon-Boot works by patching the windows logon-process in memory, to be able to accept all passwords entered on the logon-screen.
Notes and cautions:

  • Kon-Boot has become payware, but the old version of the software is still freeware. Only the new, payware, version of the software works on both 32-bit and 64-bit Windows, while the old freeware version only works on 32-bit Windows.
  • If you are using Kon-Boot to logon to a domain user, you would of course not be able access the networked resources, only the local resources on the computer.
  • If you logon to a domain user on a PC that isn’t connected to the domain server at the moment, the cached password of that user will be changed. This means that if you later try to logon with the domain user with the original password, you wouldn’t be able to do that if the PC is still not connected to the domain server.
  • If the user has some encrypted folders in the homefolder you wouldn’t be able to access those files, and if you decide to change the password once logged in via the Kon-Boot hack the user might loose access to that folder forever.

Kon-Boot splash screen

The program has been tested under the following Windows versions:
Windows Server 2008 Standard SP2 (v.275), Windows Vista SP0, SP1 and SP2, Windows Server 2003 Enterprise,
Windows XP, Windows XP SP1, SP2 and SP3 and finally Windows 7. So it should probably work with all Windows versions after Windows 2000. It doesn’t seem to be working with Windows 2000.
Note, it might not work with older computers or virtual computers. I tested it on an old Aopen XC cube, and the computer just crashed very early in the boot process. The same problem occured when I tested the ISO image in VirtualBox. It seems like Kon-Boot crashes if the following message is shown:

  • Dummy BIOS detected, trying to fix SMAP entries.

HQ posters of classic LucasArts adventure games

The user Laserschwert of lucasforums.com has done a great job of scanning and retouching some of the game-boxes used for the classic LucasArts adventure games like: Monkey Island, Indiana Jones, Sam & Max and Day of the Tentacle series. See this thread over at lucasforums.com where you could download these posters.
I’m thinking of getting some of these posters printed out myself, once I find a great (online) printshop here in Norway.

The Secret of Monkey Island Day of the Tentacle

A poster of the original art used on the back of the Monkey Island 2: LeChuck’s Revenge game was recently sold on eBay by the original artist, Steve Purcell.
It would’ve been nice if the buyer could have scanned this poster and post it online so that others could enjoy it. But since he payed $4550 USD (about 30 000 NOK) for the painting, I guess he would not do that. :-P

Backside of Monkey Island 2: LeChuck's Revenge Backside of Monkey Island 2: LeChuck's Revenge

Some non-retouched scans of these game-boxes are available at the mojoart.mixnmojo.com site, like the backside of Monkey Island 2, as I wrote about above. Unfortunately this version has too much text, screen shots and other stuff over the original painting to be able to use it as a poster like that sold on eBay.

Backside of Monkey Island 2: LeChuck's Revenge

Extract fonts from PDF files using FontForge

FontForge showing an font extracted from a PDF fileI have many times tried to find a way of extracting fonts used in different PDF files, but the solution I’ve found before always involves first converting the PDF file to a PS (PostScript) file, and then manually extracting those fonts and making them into PostScript font (.pfb and .pfa) files, this was a cumbersome process that I never got to work. But yesterday I found a much easier way to extract the fonts using FontForge’s built in “Extract from PDF” feature, wich I read about in this article: [HOWTO] Extract Fonts from a PDF File.
FontForge showing the Open Font dialog
Basically you just need to select “Extract from PDF” in the filter section of the “Open Font” dialogbox used when opening files. When you have selected your PDF file, a “Pick a font” dialogbox will open where you could select wich font to open. Then you’ll just need to compact the font using the “Encoding” menu and selecting “Compact”. This will remove all non-used glyphs in the font. Then you would have to edit the Font Info, and save the font as a font file (usally TrueType is best). Quote from the article: “Beware though, sometimes when a font is embedded into a PDF it will only contain [glyphs for] characters used. So, if the PDF file that you are trying to extract from does not contain the letter “P” [glyph], then that letter will not show up in FontForge.” (You could see an example of this in the image above, the PDF file the font was extracted from did not contain glyphs for all the letters in the english alphabet).

Installing Spyware Doctor SE from the Google Pack, without using Google Updater

Edit: Google Photos Screensaver and Norton Security Scan has been removed from the Google Pack, and the links are no longer valid, but the links have been kept for "historical" reasons.
Note: This post was previously posted under the title: "Installing progams from the Google Pack, without using the Google Updater program".

Most of the programs in the Google Pack could be installed without using the Google Updater program, but there is three one exceptions: Spyware Doctor Starter Edition, Norton Security Scan and Google Photos Screensaver, you can’t install any of these this programs without using the Google Updater program.
The version of Spyware Doctor that you could download from the Spyware Doctor website is limited to only scanning your computer, but not removing spywares.

But there is an solution, I used the Freeproxy program to sniff the connection, and set the Google Updater to use this proxy server when downloading the programs. I enabled the logging of all connections so that I could get the direct download link to the setup files.
The download links to the different programs are is:
Spyware Doctor Starter Edition v7.0.0.545 (Multilingual) (alt)
Spyware Doctor Starter Edition v6.0.0.362 (Multilingual)
Spyware Doctor Starter Edition v5.5.0.204 (Multilingual)
Spyware Doctor Starter Edition v5.1.0.272 (Old version) (Link still working)
Use the last download link, if the first doesn’t work. (Just update it afterwards).
Norton Security Scan v2.0.0.87 (English version)
Norton Security Scan v1.3.0.26 (English version)
Norton Security Scan v1.3.0.26 (Norwegian version)
Google Photos Screensaver v2.0.0.1077

The Steampunk Keyboard Mod

Steampunk KeyboardThis has to be the coolest keybord mod I’ve ever seen! A steampunk styled keyboard. The builder had to use two old 1920s-1930s typewriters to build the keyboard, but that wasn’t enough so he had to use some additional brass rimmed buttons for the extra keys. As the base for the keyboard, the author used a IBM Model M keyboard, manufactured in 1989.
Check out the article where you also could see a video of the keyboard in action.

Brushed aluminium version
Brushed Aluminum Von Slatt Keyboard
The author of the mod, Jake Von Slatt, got asked about making another version of this keyboard for sale. But he wouldn’t do it himself, so he got a friend of him to make the keyboard for the customer. So he made The Brushed Aluminum “Von Slatt Keyboard” version. He made a brushed aluminium version of the keyboard, since that was what the customer wanted. This time, a modern USB keyboard was used.

Some more pictures Continue reading The Steampunk Keyboard Mod

“Disk is not formatted” error when accessing floppies in Windows

Disk is not formatted error message
If you are still using floppy disks and Windows, you might have gotten the “Disk is not formatted” error when trying to access a floppy disk inside Windows XP, especially old floppies.
You might then think that all the data is lost, but this might not be the case. I’ve seen this problem at least three times, the last couple of months. This happened to some non-working floppies, that some friends of me asked if I could check.
I found out that if I tried to mount (access) the floppy under Linux, it worked like a charm.
On another floppy that Windows insisted was not formatted, I tried to mount it under Linux and got some error messages (read errors), but the floppy got mounted and I was able to copy all but one of the files off of the floppy.
So this simple method might also work on floppies that are slightly damaged. If the file system on the floppy is damaged, and you get this error message when trying to mount it under Linux:
“mount: you must specify the file system type”,
it might mean that the floppy is completely damaged. But you could then try to dd the floppy to a image on the hard drive, or you could try a recovery program like PhotoRec which could recover several different file types (not just photos) off of a damaged media or a media where the filesystem is damaged.
You might also get this error in Windows on other medias (like USB flash drives, etc) which might not be as damaged as Windows insists, so try mounting it in Linux (or use the recovery option above) before giving it up or formating it.

Lithium ion battery makes notebook PC explode


This is what could happen if a Li-Ion battery pack on a notebook PC malfunctions. This is somewhat scary.

From: the pcpitstop.com article

We intentionally created conditions in which the Li-ON[sic] battery pack would explode inside a generic portable. The results are dramatic. There are numerous conditions where these fires can occur in real life. Faulty battery packs (driving the recalls), faulty protection circuits inside the PC, exposure to excessive heat, and blunt force are some of the major ways that this could happen to you.